Still Loving the 1920s – Drop Waist Dress

1st photo courtesy of:  Ar Baurial, Sept. 1929; 2nd photo courtesy of Yours Truly

1st photo courtesy of Ar Baurial, Sept. 1929; 2nd photo courtesy of Yours Truly, Aug. 2013

After sewing and researching my Great Gatsby 1920s/30s Beach Pajamas, I really fell in love with 1920s fashions.  I wanted to make a drop waist dress this time and found a free online pattern for a Great Gatsby inspired top by Sew Be it Studios here.

Drop Waist Dress PatternsWhen I printed it out in adobe, I shrunk the pages slightly and used the “fit to page” option.  I cut the X-Small, and it was still far too big.  I had to take off approximately 10 cm (4″) from the back (2″ from each side of the back pieces) and I also made it longer so that I could wear it as a dress, with a slip, or as a top, on its own.Climbing a Tree postage stampI inserted a centre lapped zipper in the back, but did not lap it very much (on purpose) as I wanted to see the line of navy down the back that the zipper adds.  I liked the design element this provided.  However, I was not sure how to ‘end’ the zipper at the bottom, since it was not lapped right into the seam allowance, so I just tapered down to nothing on both sides.  I need to research how to insert an exposed zipper and next time, will insert it properly.1920s Drop Waist Dress BackI also added a vintage gold button and fabric loop closure at the top of the back of the dress.  I finished the seams with lace seam binding.  I’ve never done this before and really liked the effect, especially with the dainty floral fabric pattern.

Seam Finishing with Lace Seam Binding / Back Zipper and Vintage Button with Fabric Loop Closure

Seam Finishing with Lace Seam Binding / Back Zipper and Gold Vintage Button with Fabric Loop Closure

1920s Drop Waist Dress with ShadowsI think it is definitely reminiscent of the 1920s and reminds me of this vintage dress from the 20’s that I found online.

Drop Waist 1920s Dress with Underslip1920s amongst the flowersThe pattern called for use of a lace netting in semi-circular shaped pieces on the shoulders, but I thought these would look too costume-y and it would also be difficult to wear a jacket over top of them.  So, instead, I sewed the pieces out of the dress fabric, two for each shoulder, then turned them right side out after sewing them together. Pleated Shoulder PieceI pleated them first, ironed them flat and basted the pleats, then sewed them to both shoulders.

1920s Drop Waist Dress Climbing a Tree
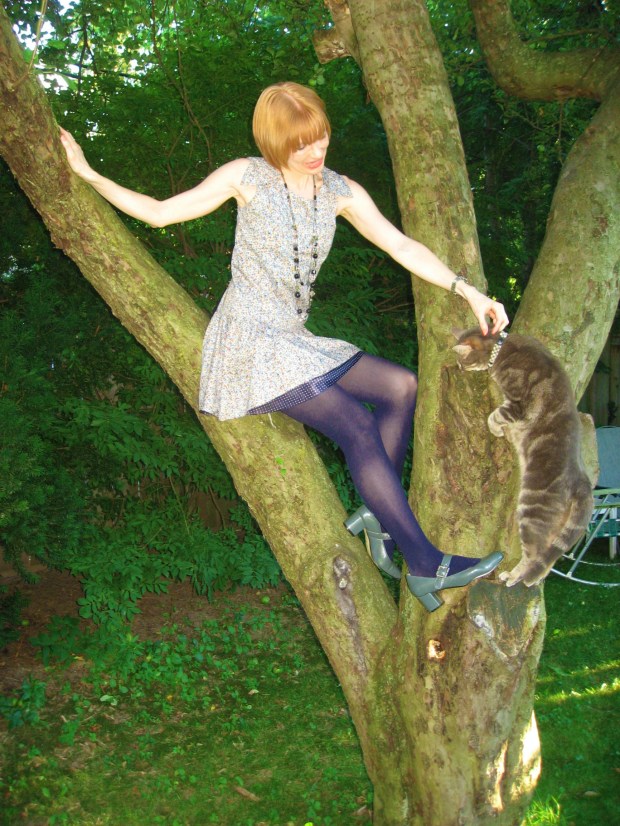
Of course, Kitty became interested in the tree photo shoot and started to stalk the scene.1920s Drop Waist Dress Climbing a Tree with KittyCat Bombed UP A TREE!!  Who Else Can Say That?

Cat Bombed UP A TREE!!  Who Else Can Say That?

Eat My Cake and Sew it Too

The lovely and beautiful Wellington Sewing Bloggers Network have officially declared today, July 28, 2013, Let Us Sew Cake Day.  This group is a wonderful and talented bunch of sewists that I have met through the blogosphere and they constantly have such great sewalongs, ideas and meet-ups.Let Us Sew CakeSo, in honour of this prestigious day, I have sewn Cake Patterns Cabarita Knit Top as well as eaten the better part of an entire sugar flower covered cake!  Wisely, I coordinated my cake with my Cabarita Top, because to not have done so, would have been rather gauche.  Cabarita Top Front and BackI love the collar piece as well as the v-neck back of this knit top.  It really elevates a T-shirt into dressed up wear, so simply and easily.  The back is also drafted to be cut on the bias and Steph recommends to keep it that way so that it hugs the curves of your back.  My fabric was on the thicker side and quite crisp, so I did not interface the cabarita front collar piece, but would have if I had used a softer and flowy fabric.

Prepping to Cut CakeThe only alteration I made was to narrow both the front and back sleeve by removing 5/8″ (1.5cm) from the bottom of each sleeve.  I had to then shorten the sleeve binding accordingly.  This way, the sleeve hugged my arm perfectly.  It’s easy to figure out a custom measurement for you, simply by measuring your bicep, around where the sleeve ends.

My Cabarita Knit TopThe only thing I would do differently next time, is to attach the sleeve binding after I had sewn the side seams.  The patterns calls for you to attach it first, but I find it more difficult to line up the cuff at the seams that way and also, any seam finishing you do, may be more visible since it extends down to the bottom of your cuff.

Floral Cabarita TopI like how the front rolled collar and V-neck back really bring the emphasis up to your face and upper half. If you used contrasting sleeve and neck bindings and collar piece or reversed the stripes in a striped fabric, this would play it up even more. The next one I make, I’d like to try contrasting pieces.
Cabarita BackThe V-neck back is very streamlining and I really enjoy the surprise of it and the symmetry it provides my back.Can't Wait to Eat That Cake

One of the unique aspects of this pattern is that you ‘draft’ your own size based on your bust, waist and hip measurement.  I chose to make mine with zero ease and using my exact measurements, but you can also choose to give it more ease by selecting a larger measurement for each area.Tea With Cake

And, you’ve seen him lurking around in the background of the above pics, but it’s likely no surprise that Kitty also enjoys Cake.Kitty Enjoying CakeI highly recommend to eat your cake and sew it too!!

I was also recently interviewed by Mel at A Curious Kiwi for Indie Pattern Month.  Check out her post, here.  Thanks Mel!

The Elusive Sun Shines! To the Beach, Posthaste!!

Kitty HugsLately, around these parts, the sun has been an elusive and mysterious stranger.  When it does decide to briefly grace us with its presence, people race out into the streets and stare directly into it!!  So, on this beautiful sunny week-end, Kitty and I were finally able to hit the beach, with me sporting my very first me-made beach cover-up and swimsuit, Jungle Boogie style!Jungle Boogie SwimsuitThe lovely and effervescent Leila from Three Dresses Project and the always fabulous Katie from Kaddidlehopper hosted Swimalong 2013.  It was great to learn about styles, sewing techniques, proper notions and history of swimsuits.  And, it gave me the green light to go ahead and sew my very first swimsuit.  You can check out the swimsuit linky party here.  The party goes all summer!Jungle Boogie Swimsuit by the LakeThen, as perfectly timed as anything could be, the very charming Kristin from Sew Classic teamed up with the engagingly crafty Ashley from Craft Sanctuary to host Show Off Your Skivvies.  It is a terrific sewalong that has interviews with designers, links to free patterns, and the goal is to sew and be brave and wear your lingerie, swimsuits and undergarments.  And, it gave me the courage to actually wear my swimsuit for the blog.  A big thanks to both of you!Running on the BeachI sewed high waisted bathing suit bottoms made from instructions and a pattern downloaded from here.  I added the gathered side panels to add some design interest and shape.  I drafted my own pattern for the swimsuit top.

Two Piece SwimsuitThe front of the swimsuit top is a rectangle measuring 1/2 the width of your bust/chest measurement minus approximately 1″ to 2″ (2 cm to 4cm) long and about 5″ wide, depending on how much coverage you want.  The back of the top is another rectangle measuring 1/2 your chest measurement minus 1 to 2″ (2 to 4cm) and about 3″ wide.  The back will be narrower than the front, so that you gather the front rectangle into the back when you sew it together at the sides.Kitty Swims

Swim Kitty Swim!!

Swim Kitty Swim!!

I then cut a lining the same size as the front rectangle and sewed in bra cups for structure.  The lining, with the attached bra padding / cups, is sewn to the front rectangle with right sides together, then turned inside out.  After sewing the top front piece to the back piece, I made a very thin strap and tied it around to cinch the middle and add shape.

Zebra and Giraffe

What do you use to line a giraffe print swimsuit? Zebra print!

I also sewed a coordinating beach cover-up called the Peachy Beachy Poolside Cover-up, a free pattern download from Fabric.com that I obtained hereBeach Cover-upI used a very thin burn-out jersey and the fabric edges rolled like bocce balls down a steep hill!  It was very difficult to flatten them out to sew the seams.

Beach Cover-up Neck Facing

Neck facing with 2″ drop at CF. Do you see how the fabric edges Roll Over? Bad fabric. STAY!!

One issue I had with the pattern and instructions was with the neck facing.  They wanted you to sew it around the neck, and then down the centre front about 2″ in a straight line and turn it to the inside.  I did this first, and it caused a rather unsightly bump in this area that I believe would have been there even with a good pressing and top-stitching.Beach CoverupSo, I re-drafted the neck facing to be the same width all the way around and stitched it without sewing down that length at the centre front.  When I turned it to the other side, obviously less of the beach cover-up top turned under with the facing, so the bottom front opening is actually lower than it should be and sits just above my waist instead of just below my bust.  This still looked good, just a different style.

Kitty in Sunglasses

Finally, the sun! So…bright…

I would like to know if anybody has a technique of how to work the neck facing the way they want it sewn without causing a large bump in the centre front?  Do share if you have any ideas.  Thanks!

I leave you with fabulousness.  Guaranteed. Enjoy: