I Want to be Ensconced in Velvet

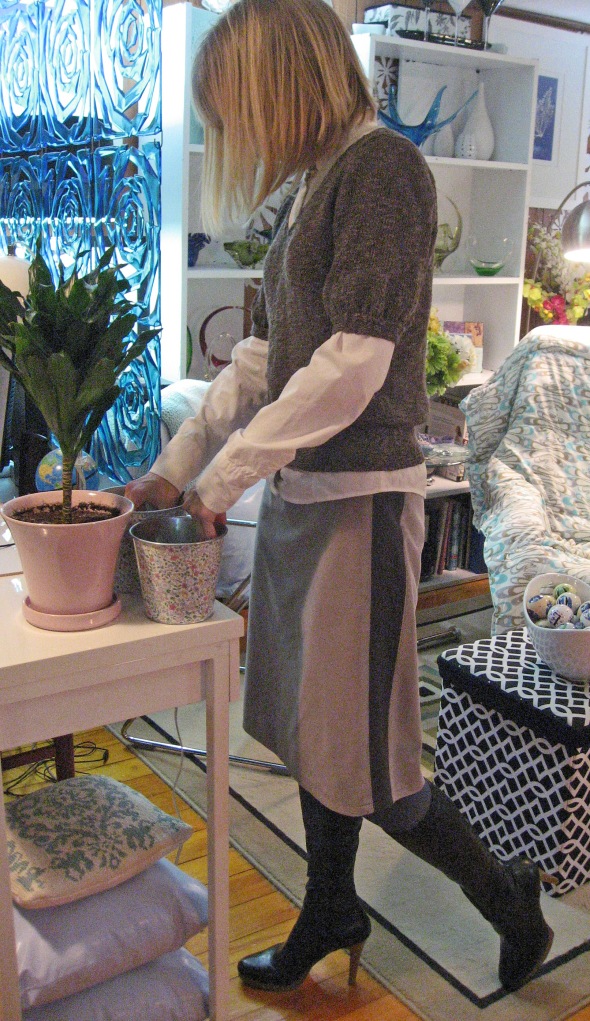
I finished a grey velvet skirt with darker grey stretch knit panels in the sides.  Not so sure if George Costanza would wear it, but I can see the joy of being ensconced in velvet, it’s soooo soft.

Velvet Skirt with Stretch Knit Side Panels and Foldover Elastic Waistband

Velvet Skirt with Stretch Knit Side Panels and Foldover Elastic Waistband

The skirt has a black fold over elastic waistband, and I placed the shiny side out, so it adds a hint of bling to the skirt.  It’s quite easy to make, A-Line with slightly rounded edges on the hemline.  The stretch panels allow you to make it more fitted to your body while still not having to insert a zipper.  Yay!

Velvet A-Line Skirt with Side Stretch Panels

Velvet A-Line Skirt with Side Stretch Panels

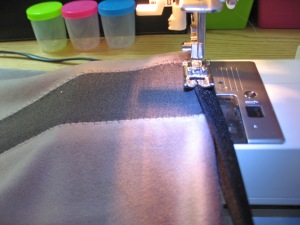
You draft it by using your waistband measurement, than measuring down from the centre point to the length you want, and add some width to both sides of the hem to make an A-line flare.  Cut out panels, approximately 4cm (2″) out of stretch knit fabric and sew to both back and front pieces of skirt.  Important:  before you cut out the stretch knit panels, make sure that the stretch is going horizontally across your body and not vertically, up and down your body.  After the panels were sewn to the skirt front and back, I added a decorative topstitch to both sides of the stretch panels.  Then, add the fold over elastic by stretching it in sections as you sew it on to the waistband.  For more information on how to attach fold over elastic, click here.  Hem the skirt by double folding and top stitching.  Done!  And velvety.  Mmmmmm.

Trim Hem With Curved Corners Using Fashion Designers Curve Ruler

Trim Hem With Curved Corners Using Designers Curve Ruler

Cut Skirt Out - Waistband Measurement and Added Width to the Hem for Flare

Cut Skirt Out – Waistband Measurement and Added Width to the Hem for Flare

Cut Out 2 Stretch Knit Panels

Cut Out 2 Stretch Knit Panels with Stretch Going Horizontally (i.e., across the short side)

Attach Stretch Knit Panels to Front and Back Pieces of Skirt and Sew Together

Attach Stretch Knit Panels to Front and Back Pieces of Skirt and Sew Together

Attach Foldover Elastic at Waist, Stretching as You Sew

Attach Foldover Elastic at Waist, Stretching Elastic as You Sew

Double Fold Hem Bottom of Skirt

Double Fold Skirt Hem and Topstitch (note the decorative topstitching on both sides of the stretch panel)

DRAPE YOURSELF IN VELVET!!

Easy A-Line Skirt

A Line SkirtI completed this A-Line skirt in the same way as the two rectangle skirt, only instead of rectangles, these quadrilateral shapes are actually isosceles trapezoids (to be precise).  Yes, that’s the math/science nerd in me leaking out.  It’s really one of the reasons why I love sewing and pattern making.  The geometry involved delights me to no end.  🙂

But, now that you’ve finished rolling your eyes and being embarrassed for me, here is some information about the A-Line skirt.

A Line Skirt 2

I used fabric with a one way pattern on it, so I actually had to cut it across the grain instead of with the length grain (following along the selvage) so that the pattern would go vertically up and down the skirt.  I’m not sure how much this affects the integrity of the skirt, but how else do you use these directional prints?  If you cut along the length of the grain, the pattern would be lost.

A Line Skirt Flare

A Line Skirt Flare

With respect to the A-Line, you can add as much flare at the bottom as you wish.  Basically, after you’ve made a rectangle, add another two triangles on either side of it to create a wider, flared bottom.

I also added a belt in the same fabric to disguise the elastic waistband casing.  To learn more about how to sew a fabric belt with buckle, click here.  I sewed on belt loops, also in the same fabric to hold the belt in the right place.

Fabric Belt and Belt Loops

Fabric Belt and Belt Loops

And, I bought a self cover belt buckle, where you cover the buckle with fabric of your choice.  I think it’s a good investment (and very inexpensive) as it really ties the belt in with the skirt.  With such a busy pattern, I didn’t really want the belt and buckle to stand out more than the skirt.